PRESSED METAL INFORMATION FOR CEILINGS
BASE MATERIAL:
Our Australian made Pressed Metal Panels are made from 0.55mm mill grade Aluminum sheets, they will not rust and are suitable for both interior and exterior use.
Although the panels are only 0.55mm thick they become quite rigid once the pressing process occurs. Our patterns match in every direction.
WHICH PATTERN SHOULD YOU CHOOSE:
Four components can be used to create a Pressed Metal Ceiling:
- Body Panel: This is the main pattern that is installed in the centre of the ceiling – it is the focal point of the room. It is often a larger pattern repeat.
- Border: This is a thin strip pattern that separates the Body Panel from the infill panel.
- Infill Panel: This panel is used as a filler between the cornice and the border. It is usually a smaller pattern repeat
- Cornice: Used on the outside edge of the ceiling. Choose a large cornice for high ceilings.
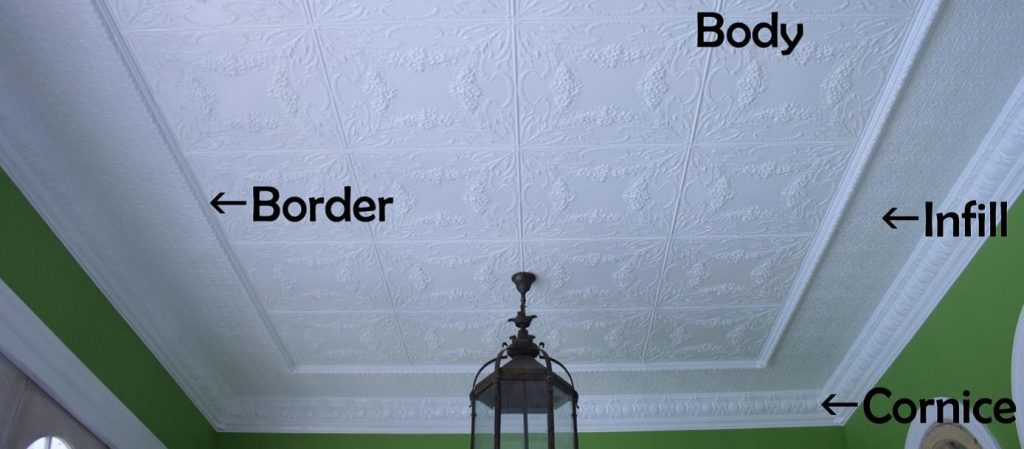
- Ceilings in large rooms look great if you use all four components.
- Higher ceilings look best with larger cornices.
- Larger patterns look best on high ceilings.
- If you choose a pattern that has a 610mm square repeat then use all four components: Body panels, border, infill panel and cornice.
- Ceilings in small rooms work best with a continuous pattern body panel.
- Use a smaller cornice on low ceilings.
BEFORE YOU PLACE YOUR ORDER
Bring in or email us a plan of your ceiling. We will guide you in choosing the body panels and cornice and as an option for for larger ceilings borders and infill panels.
With over 20 years’ experience in supplying and installing Pressed Metal we can provide you with the most economical layout.
INSTALLATION ON CEILINGS:
Substrate:
For ease of installation:
- Use a minimum 15mm thickness ply (or greater) to provide a stable, smooth and solid surface for attaching the pressed metal panels.
- The 15mm ply substrate makes installation easier as it allows a 25mm x 1.4mm soft sheet/wall board nail to be placed anywhere as opposed to being restricted to battens. Also, when hammering 15mm ply doesn’t bounce.
- With anything less than 15mm ply it is recommended to drill with a 2.4mm drill bit and rivet the panels in place using a 2.4mm x 9mm rivet.
Read through the installation instructions before you begin.
Tools that may be required:
- Tape measure
- Chalk string line (for marking installation lines on the ceiling and lines on the wall for the cornice mounting strip)
- Stud Finder (for cornice mounting strip)
- Hammer
- 25mm x 1.6mm or 1.4mm Soft Sheet/Wall Board Nails
- 2.4mm x 9mm Pop Rivets and Pop Rivet gun
- Stanley Knife and fresh blades (for cutting low profile patterns)
- Straight Edge
- Scriber
- Tin Snips (left and right hand)
- Angle Grinder (for Cornices and high profile patterns)
- Aluminium Cutting Discs
- Beeswax or a Candle for lubricating discs
- Clamp
- Metal File
- Drill and Hole Saw
- ‘Soudal High Tack Fix All’ – Commercial Grade Adhesive (Period Details can supply)
- Paintable ‘No-More Gaps’
CAUTION SHOULD BE USED AT ALL TIMES AS METAL EDGES CAN BE VERY SHARP
STEP 1: START WITH THE CORNICE FIRST.
- Begin by measuring down from either end of the ply ceiling paneling to the correct height for your cornice. Run a chalk string line between these two points and use this to mark a guide line along the wall.
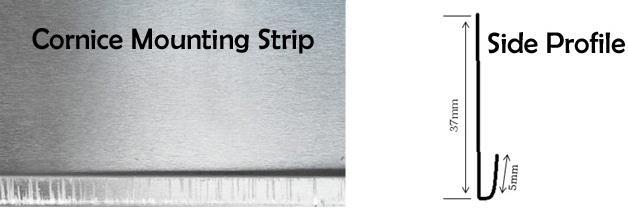
- If supplied,Glue the Pressed Tin Panels cornice mounting strip into place along the guide line with Soudal High Tack Fix All . Locate wall studs and hammer a soft sheet nail into the cornice at each stud. Lip is to face out. The cornice will sit into this lip creating a neat finish when viewed from below.
- Decide on the main perspective of your room. Any cornice overlaps should run away from this direction.
- Slip the cornice into the mounting strip and then affix the top flat cornice edge into the ply substrate with 25mm x 1.4mm soft sheet/wall board nails. The flat edge will be covered by the body or infill panels.
- Install the next length of Cornice into the Mounting Strip, overlapping the previous Cornice. You can use a dab of Liquid Nails on the back near the bottom to hold it in place.
- Rivet the overlaps of the cornice. Hold the two lengths tightly together. This will create a neater and tighter overlap.
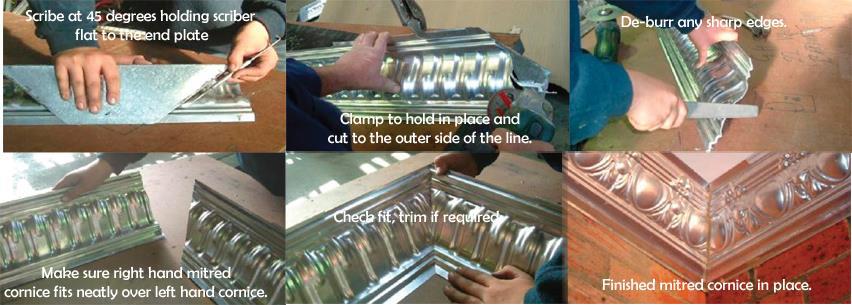
- Mitre the cornice where it meets in the corner.
– Scribe the right hand side at 45° in the nominated position, holding scriber flat to end plate. Clamp to hold in place prior to cutting with the angle grinder, cut to the outer side of line.
– De-burr any sharp edges.
– Place the mitred cornice over the square. Adjust to fit neatly by trimming the mitred cornice with tin snips.
– The left hand side should run into the corner and be left unmitred.
– Fix the left hand and right hand mitred corners in place.
- Continue around the room installing the next length of Cornice in the Mounting Strip overlapping the previous cornice.
- Paintable No-more Gaps may be smoothed over the joins to help them appear seamless.
- You may finish off the corners with mitre leaves – these are not available for all Cornice patterns. Do this after the ceiling panels are installed.
STEP 2: INSTALL THE BODY PANELS
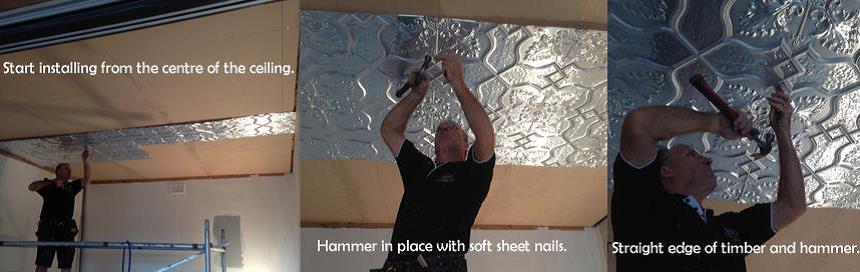
- Begin by marking the centre of the ceiling in either direction with a string chalk line. Starting from the centre point ensures that the final pattern is even around the outer edge. It also means that the pattern will be centred in the room – this is important – as it is usually where lights are fitted.
- Determine if the panels will be installed either side of this line or in the middle of the line. This will depend on the width of the ceiling.
- Continue marking out the ceiling along the longest length with the string chalk line. Lines at 915mm or 610mm depending on the sheet size. Always install to these lines. Overlaps on sheets have a little “room to move”.
- Layout the sheets, working laterally from the centre line and determine the overlap direction. How will you view the ceiling? You do not want to look into an overlap. Remember all panels are pressed to allow a 7mm (approximately) overlap join on every edge.
- Panels have a sticker on the back showing the direction in which they have come off the press – make sure that these stickers all run the same way – this will provide you with much neater overlaps.
- Starting from the centre point, attach the panels to the substrate with 25mm x 1.4mm soft sheet/wall board nails. For external application we recommend stainless steel nails. Nail at approximately 305mm intervals in all directions. This will be dependent on the pattern. Start from the centre of the panel and work outwards in all directions. Nail edges at approximately 100mm intervals (or as required). If applicable, read information below on installing borders.
- As you work out from the centre of the room overlap/underlap the panels as you go.
- To ensure that you pattern match, the panels should fit snuggly together at the overlap.
- Use a small straight edge of timber and hammer to gently tap down the overlap on the flat sections. This will minimise the overlap lines making them difficult to see when painted.
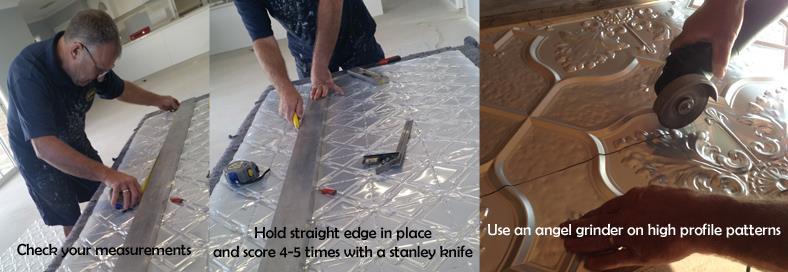
- Low profile patterns can be cut with a straight edge and a Stanley Knife, use a long straight edge (on the back of the sheet), score four to five times then rock against the straight edge and it will snap. Keep refreshing your blade.
o If you need to trim off a small section you will need tin snips. Score as above, then start cutting with tin snips – you may have to cut all along or it may tear off along the score mark.
o High profile patterns will need to be cut with an angle grinder using the aluminium grinding disc. Score first to provide a line to cut along.
- If you need to cut a hole in a panel for wiring or down lights etc use a drill and hole saw.
- If you need to cut a hole in a panel for power points, firstly scribe a 90 x 55mm rectangle, use a hole saw to make a hole in the middle and then use the tin snips to cut to the diagonal corners. The metal can then be rocked back and forth and it will snap at the scribe lines.
Important if using a border it will need to be installed under the outer edges of the body panel before you nail them down. See information below on borders and infill panels.
STEP 3: BORDER AND INFILL PANELS
Depending on the Border that you have chosen it will either fit under the body panel and the infill panel or under the body panel and over the infill panel. For a cleaner finish we recommend using an over/under border.
UNDER/OVER BORDER:
- Do not nail down the outer edge of the body pattern.
- Cut the infill panel so that it comes within the distance of the border and the body panel.
- Attach the infill panel to the ply with soft sheet nails.
- Fit the under/over border by slipping the flat edge under the body panel and the finished edge over the filler.
- Corners: you can mitre the border corners or use rosettes in the corner.
- Nail down the edges of the body panel.
UNDER/UNDER BORDER:
- Do not nail down the outer edge of the body pattern.
- Fit the under/under border by slipping the flat edge under the body panel.
- Corners: you can mitre the border corners or use rosettes in the corner.
- Nail down the edges of the body panel.
- Cut the infill panel so that it covers the flat section of the border and the flat section of the cornice.
- Nail the infill panel into place.
STEP 4: FINISHING
- Before painting, point up all overlaps (joins) with ‘No-More Gaps’. An easy way to remove the excess is with a damp paint brush. The paintbrush follows the contours of the pattern
STEP 5: PAINTING/POLISHING
- Depending on the area of installation we recommend painting as our ‘Pressed Tin Panels’ are a mill grade aluminium sheeting and some surface scratching may be present. Despite this, the panels can be left unpainted if desired.
- After pressing the panels are dipped in a non-chromate solution making them ready to paint or powdercoat.
- Panels can be sprayed, brushed or rolled to achieve the desired coverage.
- Apply an “All in One” Primer/Sealer/Undercoat e.g. Dulux 1 step and then top coat. Check with you paint supplier to ensure the Undercoat and Top Coat are compatible.
- If leaving in the “raw” aluminium finish. You can leave as is or use a metal polish such as “autosol” to polish out the scratches that are part of the manufacturing process (scratches are covered by the paint or powdercoat)
Please note: All instructions are given as a guide only. We hold no responsibility for the incorrect installation or use of our products.
NEED FURTHER ASSISTANCE?
Visit our showroom:
Open Monday to Tuesday 9am to 3pm, Wednesday to Friday 10am to 4pm, Saturday 9am to 1pm (outside these hours by appointment).
Phone our showroom:
Phone: 03 9729 1498 or 0405 460 997
Phone our installer:
David Peake on 0418 342 930 (9am-5pm Monday to Friday). As he may be busy installing please send him a message if he doesn’t answer.